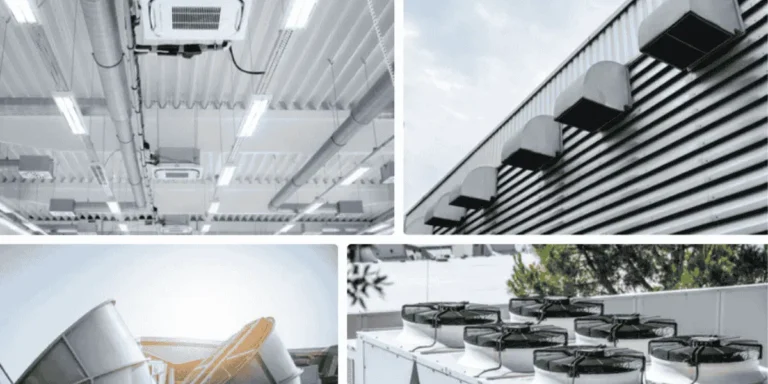
The anatomy of a dryer vent is the components that transport hot, moist air from a dryer to the outdoors. Core components consist of the vent hood, duct, transition hose, and lint screen.
Most homes use rigid metal ducts with 100 mm diameter and very short runs less than 6 m to maintain high airflow. Bends, length, and material play into lint build-up and fire hazard.
If you need to strategize upgrades or repairs, the following sections break down each component along with best practices.
Key Takeaways
- Understand the anatomy of a dryer vent and how it’s used to transfer hot, wet air outside. Dryer vent anatomy – transition duct, main vent run, elbows, termination point, lint trap – airflow, moisture removal, safety
- Select appropriate materials to minimize fire hazard and maximize efficiency. Use rigid metal for main runs and UL-listed flexible metal for short transitions, never vinyl or plastic.
- Line for lint collection to minimize potential for dryer fire. Make the duct run as short and straight as possible, restrict the number of elbows, maintain the 4-inch diameter (100 mm) and support ducts to avoid sagging.
- Keep all of your connections sealed well to avoid leaks and lint accumulation. Seal joints with metal foil tape, clamps and check elbows, joints, and outside hood for blockages and free movement.
- Clean it regularly to avoid clogs and overheating. Clean the lint trap after each cycle, regularly brush out ducts and call a professional for a cleaning each year or when dry times increase or surfaces become hot.
- Keep an eye on airflow to trap lurking issues early. Check for robust exhaust at the exterior vent, and if it’s not strong, you have long runs or sharp turns, re-route or upgrade.
What is Dryer Vent Anatomy?

Dryer vent anatomy: A dryer vent carries hot, humid air and lint from the dryer drum to the outside. The key components are the lint trap, transition duct, primary vent run, elbows and connectors, and the outside exit.
Several configurations consist of a vent hose, vent box and vent cap. Each component contours air flow, dispels moisture, restricts lint accumulation, and reduces fire hazards when properly installed and cared for.
1. Transition Duct
The transition duct connects the dryer’s exhaust port to the main vent run. Utilize approved rigid metal or UL‑listed flexible metal, not vinyl or plastic which holds lint and melts, increasing fire risk.
Make this run as short as possible, with minimal bends, with gentle curve — never pinches. Clamp both ends with worm‑gear or spring clamps. Forget regular duct tape which dries out and breaks.
A periscoping duct can work in tight spaces for short spans under around 1.2 m, but it’s uncommon and should remain below 1.2 m for optimal airflow.
2. Main Vent Run
The main vent run must be rigid metal to maintain a smooth interior and consistent diameter. That slick-sided wall reduces drag, transports lint quicker, and withstands crush injury.
Vent it the shortest, straightest path to the outside. Stick to the 100 mm (approximately 4 in) diameter, as most codes and manufacturers recommend.
Support it every 1-1.5 m so it doesn’t sag and collect lint. A long, flat run behind cabinets or ceilings requires hangers or brackets.
3. Elbows and Joints
Elbows and joints direct the vent around studs, pipes or beams yet avoid sharp turns. Less elbows also means improved flow and decreased drying times.
Seal seams with metal foil duct tape or mastic rated for high heat, not cloth duct tape. Inspect joints for leaks, loose screws and lint streaks that indicate a gap.
If you have to have multiple bends, select long‑radius elbows to reduce resistance.
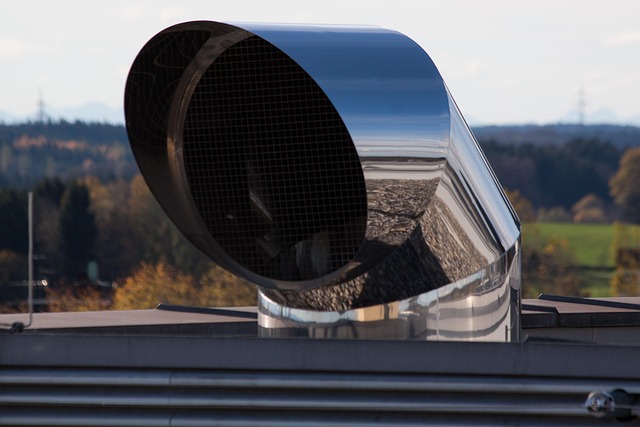
4. Termination Point
Terminate the vent at an outdoor wall or roof, never in an attic, crawl space, garage, or wall cavity. Install a vent hood or louvered damper that freely opens and keeps out pests and rain.
Keep the cap free of plants, snow, and clogging screens. Keep the location accessible for cleaning – second‑ or third‑floor terminations can cost more to service due to ladders.
5. Lint Trap
The lint trap, which catches most lint, sits just inside the drum opening. Clean it after each load to maintain strong airflow and reduce fire risk.
Inspect screen for rips and repair if torn. Sacrifice all lint, so figure on vent cleaning every couple of years, or more for heavy use.
Pros tend to run about $140 for cleaning and installs average around $200. Flexible plastic tubing catches lint and it can ignite – swap it for metal.
The whole path is simple: drum to lint trap, through the transition duct, along the rigid run and elbows, then out the vent cap, carrying heat, moisture, and leftover lint outside.
How a Dryer Vent Works

A dryer vent system carries hot, moist air and lint from the dryer drum to the outdoors, ensuring efficient drying and maintaining safety in your laundry area. The vent path, which includes proper dryer vent material, runs from the lint screen, through the blower fan, and continues through the dryer duct to the exterior cover.
Move heated air and moisture from the dryer drum through the vent system to the outside atmosphere
Inside the drum, air heats, drags moisture from fabric, then escapes through the lint screen and vent outlet. The vent hose conveys this stream to a vent box and vent cap.
Outdoor dryer vents exhaust air to the exterior which is perfect for eliminating heat and moisture. Indoor vents pass the air through a filter and back into the room — great for cold climates or flats with no outside access — but they introduce humidity and require increased filter maintenance.
In tight spaces, periscoping or slim ducts tuck behind the dryer to keep the run short.
Rely on the blower fan to propel air, lint, and moisture through the vent ductwork efficiently
The blower fan produces consistent airflow that drives air, lint and water vapor through ductwork. Short, straight runs ventilate air most effectively.
Long runs and sharp bends reduce air flow. Metal ducts, such as rigid or semi‑rigid aluminum, maintain a smooth course. Plastic vents can kink and collect lint, which increases the danger of a fire.
Go for the shortest safe run — usually under 1.2 m in tight installs — and seal joints with foil tape, not screws that snag lint.
Prevent excess humidity and heat buildup in the laundry room by ensuring proper venting
Bad venting blows the heat and moisture right back into the room, which causes damp walls, musty smell, mold, and extra long drying times. A clear vent keeps energy use low and extends the life of the heating element.
Clean vent cap with backdraft damper blocks pests and rain and allows exhaust airflow. If clothes take longer to dry, or the dryer feels hot to the touch, airflow might be obstructed.
Airflow pathway and steps
| Step | What happens | Where it flows |
|---|---|---|
| 1 | Air heats and lifts moisture from fabric | Inside drum |
| 2 | Lint screen catches large fibers | Lint screen housing |
| 3 | Blower fan drives air forward | Fan housing |
| 4 | Air, lint, vapor travel through duct | Vent hose or slim duct |
| 5 | Exhaust exits through vent cap or indoor filter | Outdoors or filtered box |
Regular maintenance reduces risk. Lint piles up quick, plastic hose retains it, which can ignite home fires.
Clean the lint screen every cycle, vacuum the vent box and cap seasonally, and book a pro cleaning annually. Anticipate around $140 on average.
A DIY cleaning kit that attaches to a vacuum or drill assists between visits and functions well on short, straight runs.
Why Vent Material Matters
The choice of dryer vent material is crucial for dryer vent safety, as it establishes the standard for security, ventilation, and electricity consumption. Proper ventilation determines how smoothly lint travels, how heat retains, and how long the dryer lives. Codes and listings from the IRC, UL, and NFPA dictate what is permissible, ensuring that the dryer vent system reduces fire risk, minimizes energy consumption, and prevents humid air from escaping into living spaces.

Select rigid metal ducts for main vent runs to meet safety codes and resist crushing or punctures.
Rigid metal—typically smooth-wall aluminum or galvanized steel—holds form under pressure, resists crushing, and conducts heat. Smooth walls reduce drag, so lint has less to latch onto. This is critical on those long runs behind walls or ceilings where damage is difficult to notice.
For instance, a 6 m straight run in rigid pipe will maintain better airflow than the same length in flex, even before least bends. Where the run is over 10.7 m with no bends, install a booster fan designed for use with dryers, but keep the duct rigid to preserve static pressure and minimize noise. Seal all joints with duct-rated metal foil tape, not cloth-backed tape.
Avoid improper dryer vent materials such as vinyl or thin foil ducts, which increase fire risk and clogging.
Vinyl and thin foil accordion-style tubes crush, tear and trap lint in their ridges. They kink behind the dryer and around sharp bends. Heat desiccates them, makes them brittle, and causes them to melt down in a lint-stoked blaze.
Even semi-rigid foil that’s too thin can snag lint if squeezed. If you have an aluminum foil connector at the appliance, check it frequently for punctures or flattening, and keep it as short and as direct as possible.
Recognize that correct vent material improves airflow, reduces lint accumulation, and extends dryer life.
Proper air flow translates to faster dry times, lower energy consumption and less strain on the heater and motor. Smooth, fire-resistant metal expedites lint’s departure, which means both your lint screen and vent hood stay cleaner.
Better flow evacuates humid air more completely, which reduces wall and closet mold hazard. Over time, this lowers service calls, belt wear, and bearing heat.
Approved materials and where they fit
- Rigid aluminum or galvanized steel pipe (main runs): smooth interior, low lint, high fire resistance.
- Semi-rigid aluminum (short appliance connection): holds shape, safer than thin foil, moderate airflow.
- Listed transition duct (UL 2158A) at the dryer: use only if allowed by the maker, keep under 2 m.
- Metal wall cap with backdraft damper (termination): blocks pests, sheds rain, limits wind blowback.
Common Anatomical Failures
Dryer vent anatomy fails in predictable ways: crushing, clogging, and disconnection. All of which cut draft, increase energy consumption and potentially cause fire hazards. Short, punchy inspections and a consistent maintenance program identify problems early, and keep ducts under control, including an overall length less than 7.6 m (25 ft).
- Crushing: Duct walls flatten, choke flow, and overheat the dryer.
- Clogging: Lint and debris build up, raising fire risk and cycle times.
- Disconnection: Joints separate, leaking lint and humid air indoors.
- Excess length or tight bends: Static pressure climbs, drying times spike.
- Poor materials: Thin foil or plastic kinks and tears. Metal ducts last longer.
- Bad placement: Termination near intakes or A/C (keep ≥1.8 m) recirculates moist air.
- Overloading loads: Too many clothes shed more lint and drive structural clogs.
Inspection on a normal regimen is what counts. Inspect behind the dryer, each elbow and outside hood monthly. Remove lint using a wet/dry vacuum or brush. If a load takes more than 55 minutes, consider it a vent warning.
Crushing
Crushed ducts appear as flattened areas behind the dryer or at sharp turns. The inside diameter gets smaller, static pressure increases, and heat accumulates. This stresses heating elements and may trip safety shutoffs.
Rigid metal ducts maintain form superior to foil flex, don’t get kinked and maintain a consistent bore for constant flow. At install, space the dryer from the wall, employ an offset or recessed box if the room is shallow and don’t stack storage against the run.
If a layout continues to grind the line, shift the dryer a couple of centimeters or reroute to minimize bends and points of contact.
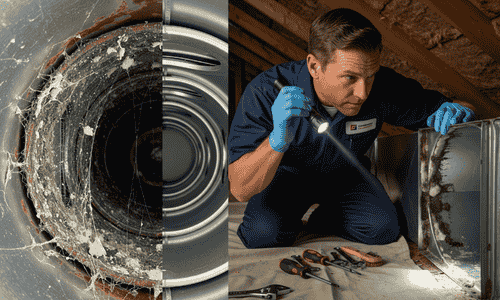
Clogging
Lint is airy, fibrous and extremely flammable. It sticks at seams, screws and elbows, then snowballs. Longer runs and sharp turns exacerbate it.
Symptoms such as extended cycles, a hot cabinet, lint at the back panel, a faint burning smell, or shutdowns after minutes. Clean the vent path monthly with a wet/dry vac, brush the full length each season.
Schedule an annual professional cleaning for concealed lint at elbows and the lining. Employ a second lint trap just in case in high-lint configurations and clean it frequently. Don’t overload, big loads throw more lint and jam tufts into joints.
Disconnection
Examine joints, elbows and the termination hood for gaps, play or scorch marks. Just make sure the outside damper opens and shuts. Screen needs to be clean.
Inspect clamps and foil-backed metal tape, not cloth or duct tape. Track signs: sudden humidity indoors, fine gray dust, or lint near joints.
If any joint is loose — re-seat the duct, add a good band clamp and seal seams with UL‑listed metal tape. Substitute shredded pieces with stiff or semi‑stiff metal. Check to see if the full run length is less than 7.6 m and minimize elbows.
Failure Table (summary)
- Failure: Crushing | Causes: tight space, heavy items | Fix: rigid metal, offset box, reroute
- Failure: Clogging | Causes: lint, long runs | Fix: monthly vacuum, annual pro clean
- Failure: Disconnection | Causes: weak clamps | Fix: band clamps, metal tape, replace sections
The Invisible Threat: Airflow
Airflow is crucial for dryer vent safety as it forces moisture and heat from the drum, through the dryer vent ducts, and outside. When it stalls, drying lags, parts run hotter, and danger increases.
Measure airflow at the vent exit to confirm the vent system is unobstructed and functioning properly.
Inspect the vent at its wall or roof exit. Check for a firm, consistent blast when the dryer operates on a heat cycle. Weak flow indicates a clog, crushed hose, or a fan issue.
Even a rudimentary vane anemometer will provide a measurement: consistent velocity indicates the route is unobstructed. Observe the outside flap or grille. It ought to open wide and remain open throughout the cycle.
If it just trembles, the airflow’s low. Just do a quick lint check at the cover. If you spot lint stuffed behind the screen or cap, anticipate additional lint lurking in the duct. A burning smell from the dryer is a red flag.
Cease operation and check, for hot lint indicates clogged flow.
Address any airflow restrictions caused by long duct runs, excessive elbows, or dirty vents.
Long runs drag slow air. As a general guideline, the maximum developed length should be under 10.7 m, and each 90 degree elbow deducts 1.5 m from that limit.
A 7.6 m, 2-elbow configuration is already close to the maximum. Tight bends, crushed flex hose or hard turns behind the dryer create drag. Lint from oversized loads, towels and fur is the most common choke point.
Clean the lint screen every cycle, but clean the duct as well. Coupled with annual professional cleaning and inspection, it helps keep the path clear and cut fire risk.
Inspect the hose for rips or loose clamps. Any gap leaks hot, lint-laden air into the home which damages air quality and increases fire hazard.
Recognize that poor airflow leads to inefficient drying, increased wear on the appliance, and higher fire risk.
Clothes that require more than one cycle–that’s the canary. The dryer operates longer, costs more to operate and wears heaters, sensors and bearings more quickly.
Bad airflow is the leading cause of dryer fires — though it’s avoidable with maintenance. If the laundry room is humid, the dryer fluff feels really hot or you see nests or debris on your vent cover, your airflow is low.
A quick once-a-month visual check of the outside cover can catch these problems early.
Optimize vent design and maintenance to ensure strong, consistent airflow from dryer to exterior.
Utilize smooth, hard metal duct with minimal turns. Make the path as short and straight as your space will permit.
Swap out the flimsy plastic hose for rigid or semi-rigid metal. Seal joints with foil tape, not screws that catch lint. Support long runs so they don’t sag.
Clean the duct and booster fan (if utilized) on a predetermined schedule, and schedule an annual pro cleaning. After any adjustment, remeasure flow at the exhaust to verify gains.
Maintain Vent Integrity
Vent integrity is having a clean, code-compliant dryer vent system that takes moist, lint-laden air — from the clothes dryer — to the outdoors, with no leaks, kinks, or heat traps, relying on proper dryer vent materials and consistent maintenance.
Schedule regular dryer vent cleaning and inspections to uphold vent system performance and safety.
Clear the lint trap after each load, then schedule a complete vent cleaning and inspection at least annually, or semi-annually for heavy use, long runs, or pet fur. Watch for slow dry times, hot laundry room walls or a damp odor; they all signal lint piles or crush points.
Take a vent brush corresponding to the standard 100 mm (4 in) duct and run it from both ends where feasible. Check the exterior hood while the dryer runs: you should feel strong air and see the damper open fully. No screens or cages on cover; they catch lint and choke flow.
Verify duct is smooth inside and joints are tight. If you discover foil flex, plastic or tears, schedule a replacement, not a spot fix.
Replace damaged or outdated vent components with code-compliant, rigid metal parts.
Smooth bore, rigid metal duct is essential for maintaining shape and tolerating heat while effectively shedding lint. Using improper dryer vent material, such as vinyl or plastic ducts, can lead to melting, sagging, and increased fire hazards. It is crucial to adhere to manufacturer sizing standards, which generally require a diameter of 4 inches (100 mm) and UL-approved components for optimal dryer vent safety.
When designing your dryer vent system, aim for the run to be as short and straight as your layout allows. As a general guideline, 25 feet (7.6 m) is the maximum length, with each bend adding to the total length, which can smother airflow. Local dryer vent codes may specify a maximum of 8 feet (2.4 m) from the dryer to the initial transition, so always check the sticker and local regulations.
Seal all joints using metal foil tape instead of screws that can protrude into airflow and collect lint. It is also important to terminate the duct outdoors with a low-profile hood that opens freely and is unscreened to ensure proper ventilation and efficient drying.
Educate all household members on the importance of lint trap cleaning and vent maintenance.
So make lint-cleaning a ritual of every wash day. Show where the exterior vent is, how a strong air stream should feel, and what warning signs look like: clothes hot but still damp, dryer auto‑shutoffs, or a musty scent.
Give them a reason rigid metal matters and explain why plastic or vinyl is unsafe. Set simple rules: no running the dryer when away or asleep, and report any burn smell at once.
Document maintenance dates and create a checklist for ongoing dryer vent care and safety.
Keep a dated log with tasks: clean lint trap (every load), inspect hose and joints (monthly), wash the exterior hood and confirm free swing (quarterly), brush the duct and check clamps, tape, and clearances (semi‑annual), and replace worn parts (as needed).
Include model numbers, duct diameter, length and number of bends so future fixes are fast and uniform.
Conclusion
Dryer vents appear straightforward, but tiny components perform mighty tasks. A short, smooth path slices lint build-up. Rigid metal retains shape and heat. Tight joints prevent leaks. Open air flow keeps temps in check. Which translates into dry loads, low trauma, and less strain on the unit.
Use rigid metal duct, short runs, and minimal bends to stay safe. Do keep the CAP clean! Inspect the vent tubing for kinks behind the dryer. Exchange foil or plastic hose for rigid pipe. Clean lint from the lint screen each load and from the vent line annually. A whiff of the air flow test does as well. For instance, hold a sheet at the vent cap. It ought to fly out forceful.
Want a next step! Show us your setup and receive a fast plan.
Frequently Asked Questions
What parts make up a dryer vent system?
A standard setup consists of the dryer outlet, transition duct, and rigid metal duct material, along with elbows, an external vent, and a backdraft damper. Each component directs humid air outdoors, ensuring proper ventilation and minimizing fire hazards.
How does a dryer vent move air and lint?
The dryer’s blower vents warm, moist air through dryer vent ducts to the exterior. Lint rides along with the air, making regular dryer vent cleaning essential. Smooth, short, and straight ducts assist in ventilating lint out effectively.
Why is rigid metal ducting better than flexible foil?
Rigid metal vent material has a smooth interior that enhances airflow and is crush resistant. It effectively withstands heat and prevents lint buildup, which is crucial for dryer vent safety. Most codes prefer rigid or semi-rigid metal to ensure proper ventilation.
What are the most common dryer vent failures?
Common culprits include improper dryer vent material, such as crushed ducts and excessive length with numerous elbows, which restrict airflow. Routine dryer vent cleaning and inspection forestall issues like slow drying and increased fire risk.
How do I know if airflow is restricted?
Keep an eye out for extended dry times, a hot laundry room, burning odors, or lint buildup surrounding the external vent. A weak airflow test at the outside vent, too, spells trouble. If you see these, turn off the clothes dryer and check/clean your dryer vent system.
How often should I clean the dryer vent?
Clean the lint filter after each load to ensure proper ventilation. Scrub the entire dryer vent system once annually, or biannually if you frequently dry clothes, have pets, or utilize extended duct runs for efficient drying.
What maintenance keeps vent integrity strong?
To ensure proper ventilation, keep your dryer ducts short and straight, using rigid metal vent material with sealed joints and minimal elbows. Regular dryer vent cleaning is essential, so plan for it and check for any crushing or kinks after relocating the dryer.